Cleaning your living room, dusting ornaments, and ensuring the bathroom is hygienic are everyday cleaning activities.
Yet, a lot of people forget that they also need to clean their cleaning tools. Ironic, really!
Yep, this does mean that your Henry Hoover, Dyson and Shark all need to be cleaned! And as much as you’d like to skip this step, you can’t.
Cleaning is essential for these appliances because a clean vacuum cleaner means it will perform better, smell better, last longer, and be more hygienic.
With this in mind, let’s find out how you clean and maintain a vacuum cleaner.
Before You Start Cleaning Your Vacuum Cleaner
Check out the pointers below before you start taking your vacuum cleaner apart to clean it:
- Make sure the vacuum cleaner is off/taken down from its charging stand before you start cleaning it.
- It’s a good idea to wear gloves when cleaning a hoover because you may handle some debris during the cleaning process.
- Don’t get the vacuum cleaner wet, as this will cause the motor to malfunction!
- Don’t soak the vacuum cleaner in chemical-ridden cleaning solutions. You can only wash certain parts of the machine with warm water and washing-up liquid (more on this later).
- If the weather is warm and it’s not raining, it might be a good idea to clean your vacuum cleaner outside. This way, any dust from the machine will be spread outdoors rather than indoors!
- Read your user manual! Each make and model of vacuum cleaner comes with its own instructions. If you can’t find your user handbook, just do a quick online search on the manufacturer’s website and find the guide that suits your vacuum.
- When you’ve removed certain parts from your vacuum cleaner, you’ll notice that the crevices where the parts slot into may be dirt or dusty. You can either wipe these sections with a microfibre cloth or use compressed air to blast the grime away!
- Make sure you reassemble your vacuum cleaner properly. Otherwise, it won’t work effectively. If you’re worried about taking parts off your hoover, see your user manual for advice, watch some YouTube videos, or record yourself, so you know how to put the appliance back together again.
Let’s start cleaning!
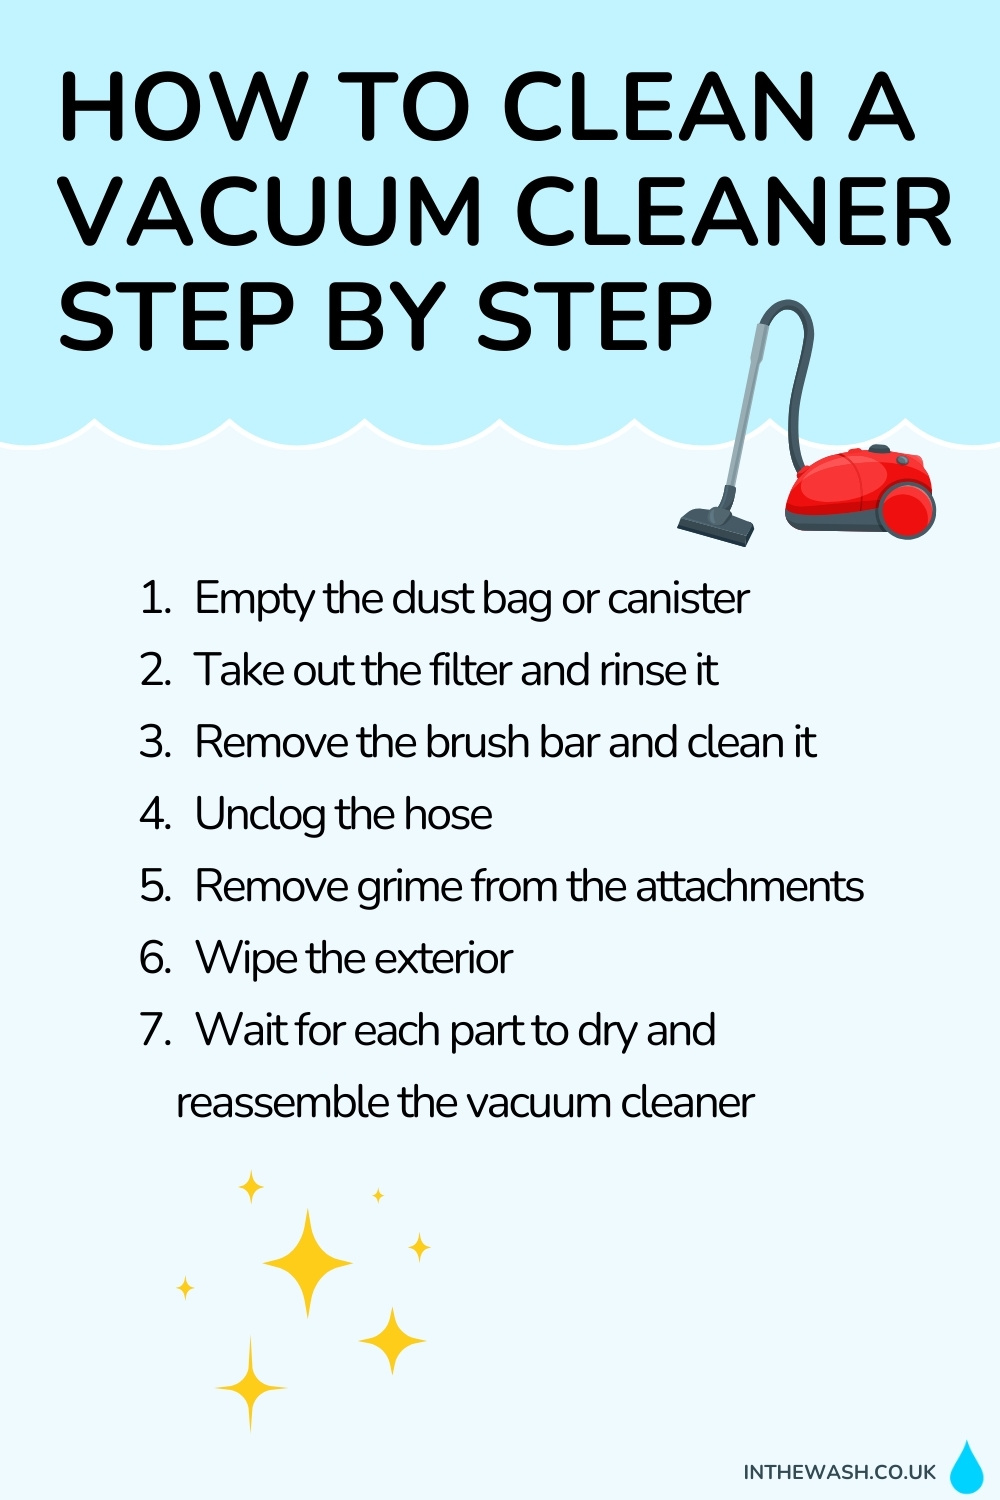
How to Clean a Vacuum Cleaner Step by Step
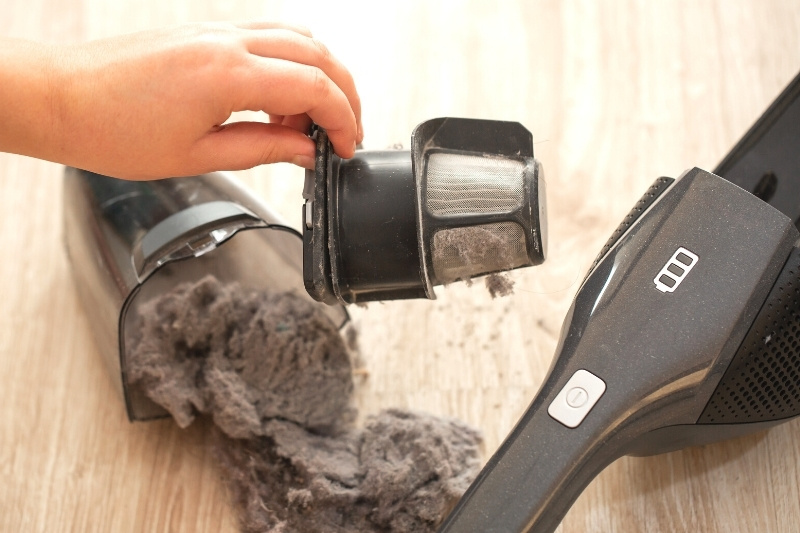
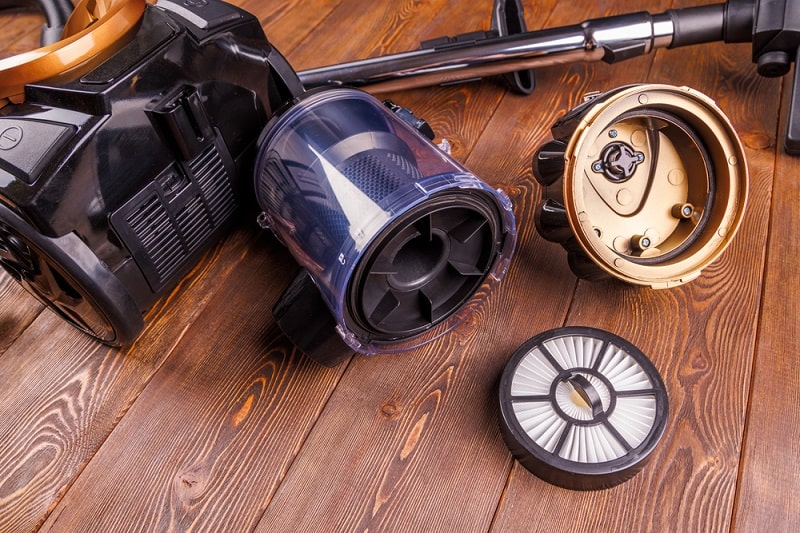
Step 1: Empty the dust bag or canister
When cleaning a vacuum cleaner, one of the easiest jobs to complete is removing the dust bag or canister from your hoover, and emptying the contents away.
When you’ve done this, you can clean the canister/bag out and reuse it, or in the case of some dust bags, bin them!
If you’ve got a dust canister, all you need to do is unclip it from the hoover, empty the debris into a rubbish bag, and clean the can with warm soapy water and a microfibre cloth.
You must make sure the canister is free from suds and completely dry before you replace it.
If you’ve got a dust bag, in some cases, you can empty the contents out of the bag and reuse it, but in other cases, you’ll have to throw the bag away and add a new bag to the appliance.
It’s also worth cleaning the area where the hose feeds the dirt into the bag/canister. This area can get clogged with hair and large chunks of grime quickly.
To clean this area out, you may be able to tease the dirt free with your fingers/tweezers.
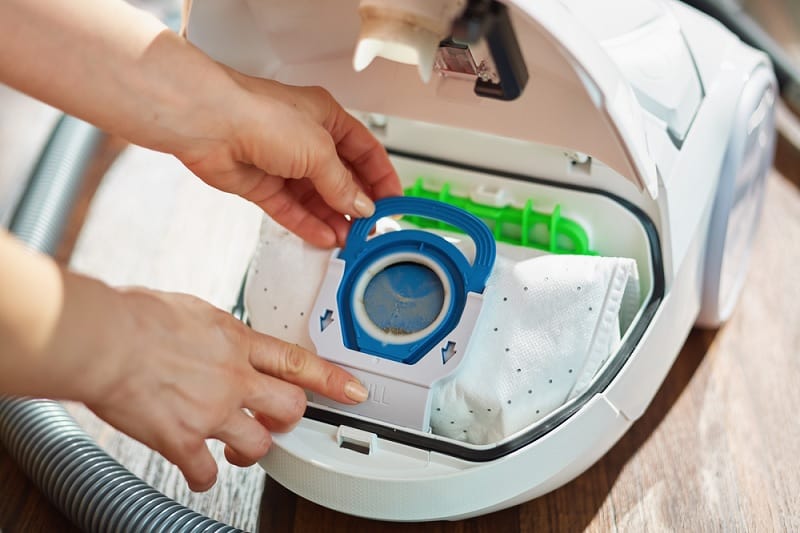
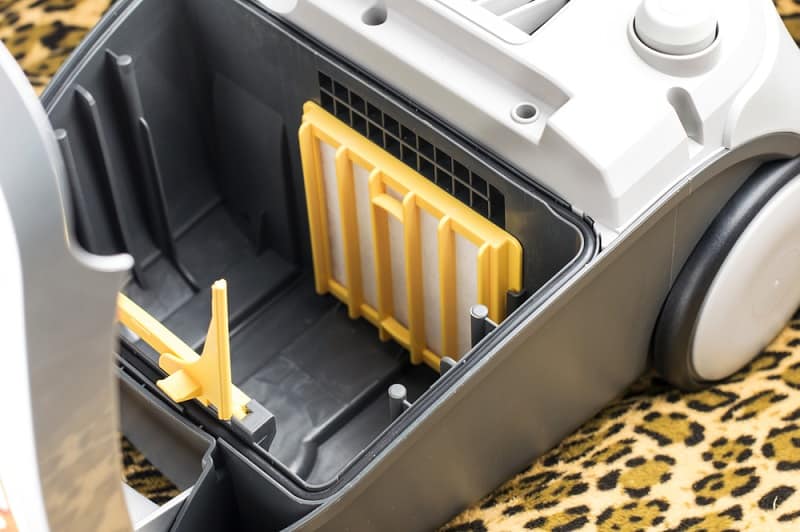
Step 2: Take out the filter and rinse it
Cleaning the filter is an essential step, as a blocked filter can hinder a vacuum cleaner’s performance.
In general, if your vacuum cleaner comes with a removable filter (not a HEPA filter), you can remove it from the machine, give it a gentle tap over a bin (dislodge dust), and then clean it by holding it under a cold-water tap.
When the water runs clear, you know the filter is sufficiently clean. Don’t put the filter back inside the vacuum cleaner yet. You need to wait for the filter to dry thoroughly instead (it can take up to 24 hours)!
You must not use any cleaning solutions to clean a filter.
Note: Before you carry out the method above, you should read your user manual to double-check that this method suits your particular machine.
As noted above, if you have a vacuum cleaner with a HEPA filter, you won’t be able to clean it following the method above.
When it comes to dirty HEPA filters, you typically need to replace them rather than wash them.
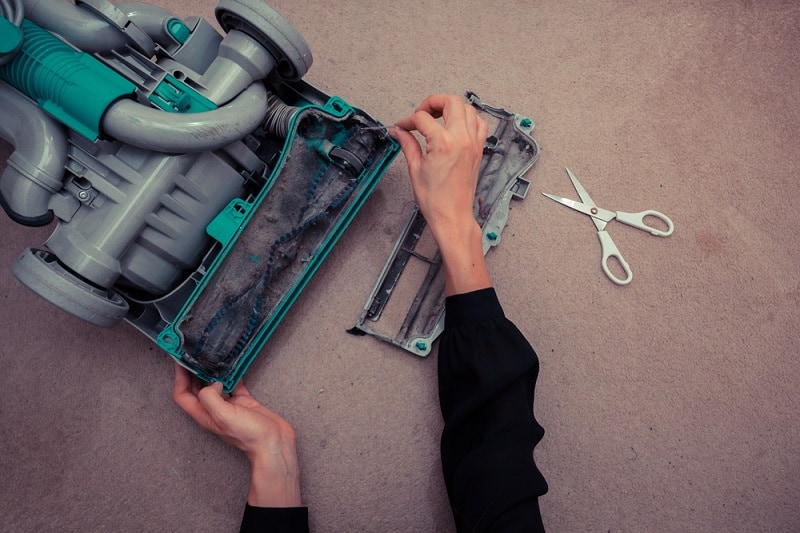
Step 3: Remove the brush bar and clean it
Next on your to-do list is the brush bar! The brush bar is the part of the hoover that makes direct contact with your surfaces and dirt, so it’s usually a pretty grotty section of the appliance!
To clean a brush bar effectively, remove it from the hoover. Once you’ve done this, you can remove the grime from the bristled section of the bar.
The brush section is usually matted with lots of hair and threads, and in most cases, the unravelling process isn’t a pleasant or easy task.
In fact, it’s usually a very frustrating one! So, to make your job a little easier, source the right kind of tools and use them to de-tangle the hair/threads.
Tools you could use include scissors and stitch picks like these available on Amazon. All you need to do is use the stitch pick to pick at the hair/threads until it gets looser, and then you can cut the strands off.
If you pick at the hair/threads first, it won’t be so tight around the brush, so when you cut them off with the scissors, you can avoid cutting the brush’s bristles!
If the brush bar looks worse for wear, consider replacing it. You’ll have to check the manufacturer’s website for further guidance on this, as you will need to buy a like-for-like brush bar that fits into your vacuum cleaner.
At this point, you could also wipe the surface around where the brush bar goes to remove any grottiness from it. If need be, you could use a very damp cloth to dislodge any gunky messes from the surface.
Step 4: Unclog the hose
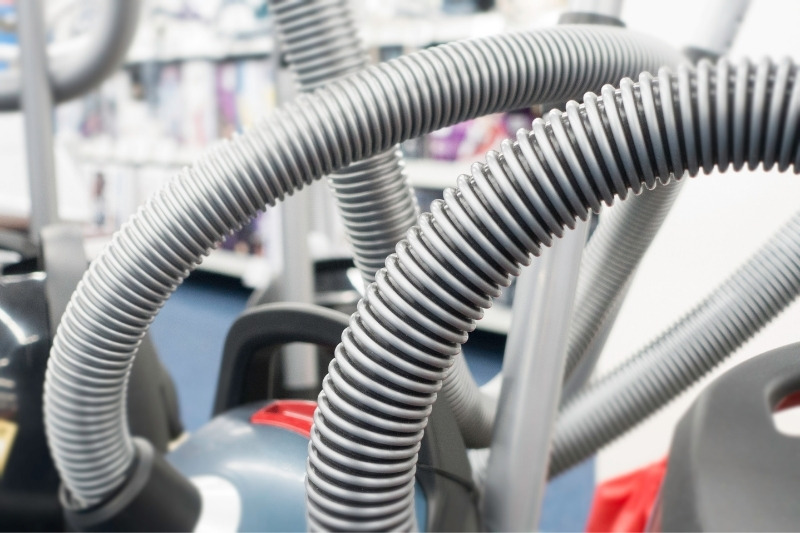
It’s not unheard of for grime to get stuck in a hose. And if the debris in question is allowed to rest in the hose for too long, it can become extremely pongy!
To clean the hose, detach it from the entire appliance (both ends) so you end up with a loose hose. Then pop the whole hose into some warm soapy water for 10 minutes. When you’re done, flush water through the hose to clean it out and hang it up to dry.
When the hose is detached, you can check it for any rips or potential problems. If you see a potential issue, you can either look into a way of solving it or replace the whole hose.
If you think something is blocked in the hose (perhaps the suction isn’t very good), detach the hose again and slide a mop/brush handle up the length of the whole hose.
The handle will dislodge any chunks that are plaguing the hose. You can also get a similar effect if you use pipe cleaners!
It’s also worth having a torch with you, so you can shine a light down the hose to see if you can spot any blockages.
The hose must be completely dry before you put it back on the vacuum cleaner.
Step 5: Remove grime from the attachments
The parts mentioned above may be the most important ones in a hoover, but you mustn’t forget to clean the other attachments you use. The crevice and brush tools, for example, also need to be cleaned.
You can use a damp cloth soaked in soapy water to clean solid attachments like the crevice tool. And for the brush attachment, you can use scissors/stitch pick to untangle any hair and general debris from the bristles.
Step 6: Wipe the exterior
Although the internal regions of a vacuum cleaner are the dirtiest, you should also clean the external areas. These include cleaning the wheels and main body of the machine.
To clean these areas, you can rub a microfibre cloth over them, and if you’ve got stubborn dirt to tackle, you can wipe the surface with a damp cloth.
Just make sure you don’t use too much liquid. And remember to dry the areas afterwards.
Step 7: Wait for each part to dry and reassemble the vacuum cleaner
Once you’ve finished cleaning your vacuum cleaner, you’ll have to wait for every section you’ve cleaned to dry properly before you reassemble it.
In most cases, parts will dry relatively quickly, but some parts, like the filter, will take a whole day to dry.
You cannot rush the drying process or put wet parts back inside the hoover because this can cause the vacuum to break down or become smelly!
Ultimately, this usually results in costly repairs and hassle—something you want to avoid!
When you know that all the parts and sections are dry, you can pop the machine back together and start using it as usual.
How to Maintain a Vacuum Cleaner
Below you’ll find the easiest ways to maintain a hoover! Remember that if you constantly stay on top of the cleaning, not only will your machine stick around for longer, but it should perform better too!
Follow these tips:
- Empty the bag/canister regularly.
- Clean the brush bar frequently.
- Don’t suck up wet foods and liquids (unless you have a wet & dry vacuum cleaner)!
- If you’ve accidentally sucked up wet food or mud, for example, remember to empty and clean your machine afterwards.
- Give your vacuum cleaner’s surfaces a quick wipe with an antibacterial wipe every few days.
- If your vacuum cleaner has indicators that tell you when something is blocked or needs cleaning, listen to what the machine is saying and maintain the parts in question!
- If your vacuum cleaner still smells after you’ve cleaned it, don’t panic, as this does happen from time to time. All you need to do is make your machine more aromatically pleasing again. You can make your hoover smell nice by using vanilla powder, essential oils, and bicarbonate of soda, to name a few ideas!
How Often Should You Clean a Vacuum Cleaner?
Try to clean your whole vacuum cleaner every three months at least, but do it sooner if your home gets dusty or you have pets.
You should empty the dust canister/bag when the debris inside is close to the max level line. Here are the tell-tale signs that your vacuum cleaner is clogged up with dirt and needs to be emptied:
- Your vacuum cleaner has lost suction power and is not hoovering the floor effectively.
- There’s a funny smell coming from the machine.
- The hoover tells you that its canister needs to be emptied.
- You can see that the canister/bag is full!
Similarly, you should clean the filter regularly. This will prevent a build-up of dust particles in the filter and ensure that the appliance remains at peak performance.
In addition, if your vacuum cleaner is obviously dirty, for example, you rolled the wheels through some paint or gooey mess, you will need to clean it immediately!
If you don’t remove the grime, you’ll traipse it all over your house and in the process, you’ll stain various surfaces.


Bethan has a passion for exploring, reading, cooking and gardening! When she’s not creating culinary delights for her family, she’s concocting potions to keep her house clean!


")
")
")
")