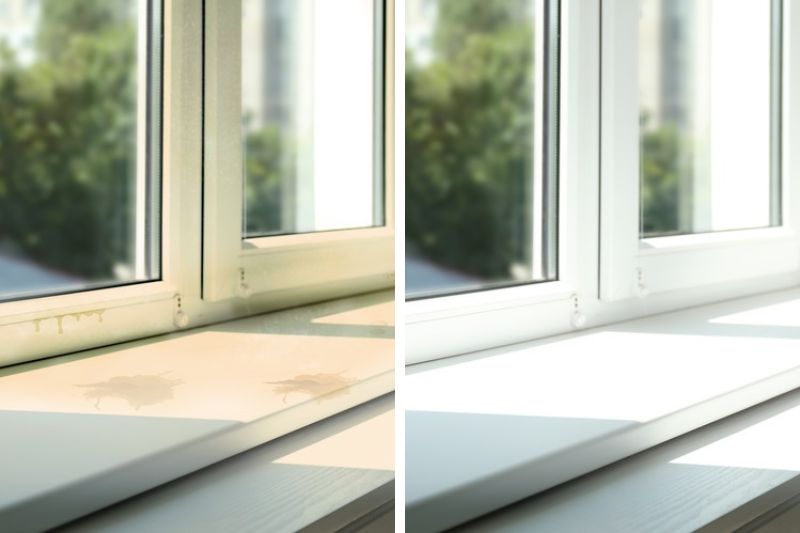
Have you taken a good look at your window sills recently? This often-overlooked area is a haven for dead bugs, bacteria and dust, and it needs to be cleaned regularly!
Not only does a clean window sill look aesthetically pleasing and inviting, but it’s also more hygienic! So, how do you go about cleaning window sills? Read on to learn more.
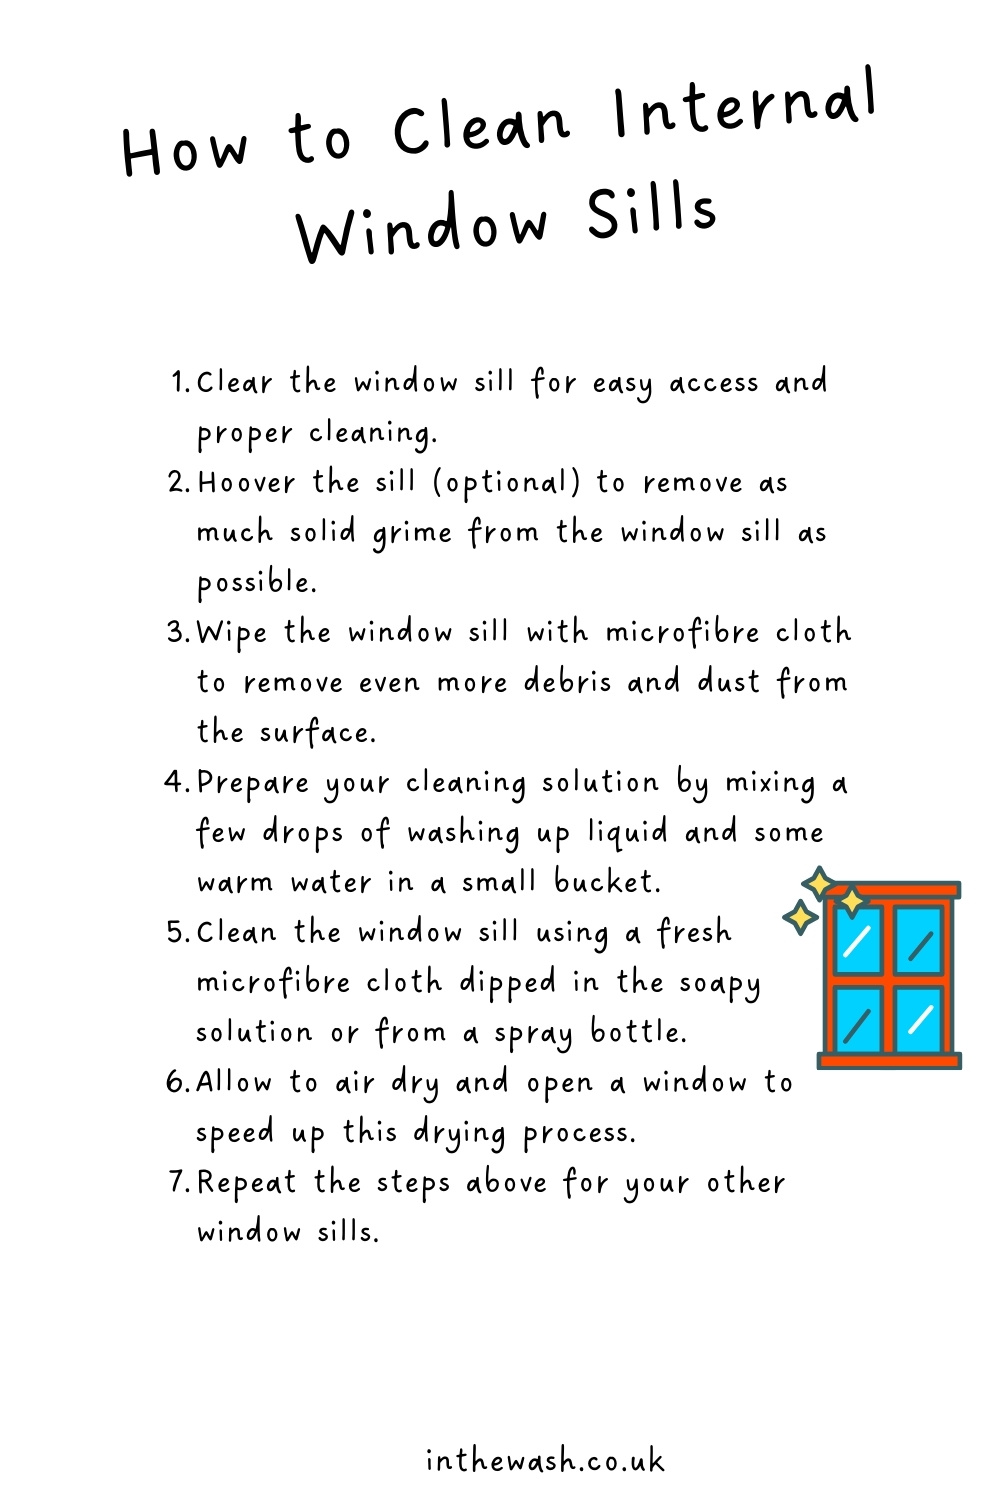
Cleaning Internal Window Sills
Step 1: Clear the window sill
Before you start cleaning the sill, you need to empty everything from it. This includes candles, photographs and vases, for example.
This quick but essential step will give you easy access to the window sill, so you’ll also be able to clean the surface properly.
Tip: If your painted wooden windows have started to flake, you should remove these flakes before cleaning. You can do this by brushing the surface with a soft-bristled brush. You can repaint the sill at a later date.
Step 2: Hoover the sill (optional)
Once the window sill is clear, you can hoover the entire area with a vacuum cleaner.
The purpose of this step is to remove as much solid grime from the window sill as possible.
You’ll need to suck up a whole load of dust, hair and dead bugs from the sill at this point. So, it’s a good idea to pop the crevice tool on so that you can get into all the nooks and crannies.
If you don’t have a vacuum cleaner at hand, skip to Step 3.
Step 3: Wipe the window sill
For this next step, you’ll need to grab a dry microfibre cloth.
Wipe the entire window sill down using the cloth. The purpose of this step is to remove even more debris and dust from the surface that the vacuum cleaner might’ve missed.
Pay close attention to extra dirty spots like the corners. And if you’re having trouble removing grime from these zones, use some compressed air to dislodge the stubborn dirt from them!
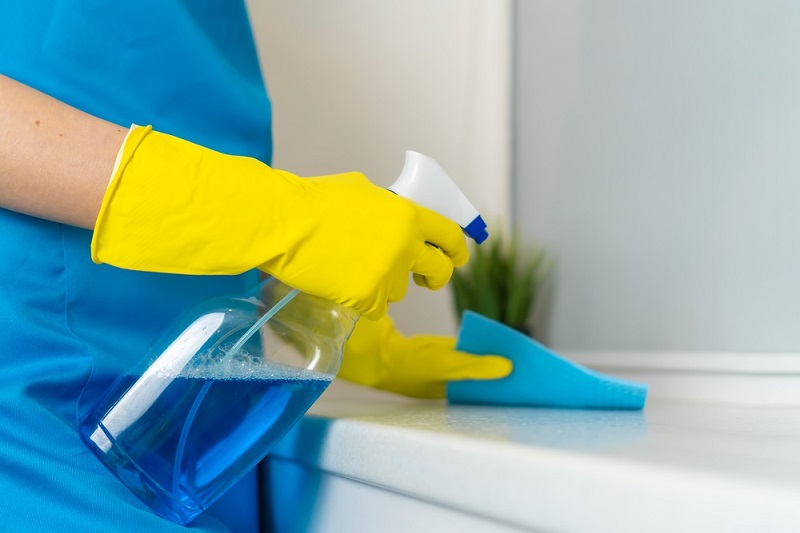
Step 4: Prepare your cleaning solution
To clean a window sill, you don’t need to use harsh chemicals and tools. All you need is a little warm soapy water.
In a small bucket, pop a few drops of washing-up liquid and add some warm water to it. Mix the two products to create a warm soapy mixture. This is the cleaning solution you’ll use!
If you don’t have a bucket at hand, or you’d like to have more control over how much liquid you pop on your window sill, you can use a spray bottle instead.
In this case, you need to add a few blobs of washing-up liquid to the bottle and then add water.
Tip: If you don’t want to add washing-up liquid to the spray bottle, use a teaspoon of bicarbonate of soda instead.
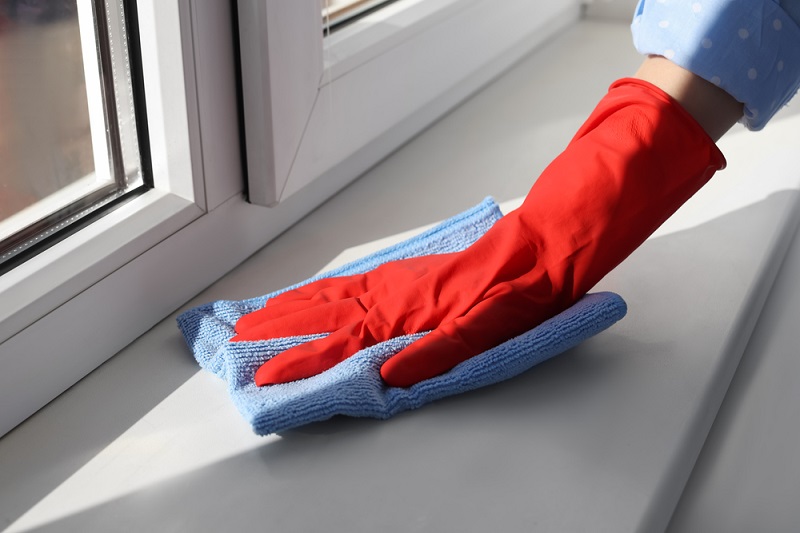
Step 5: Clean the window sill
Using a fresh microfibre cloth, start to wet clean the window sill.
You can either dip your cloth in the soapy solution you created in Step 4, wring out the cloth so it’s slightly damp and then rub the sill down OR, you can squirt some of the solution out of the spray bottle and onto the cloth, and then rub the sill down.
You must not drench your sill in water, whatever it’s made of. Make sure your cloth is just damp throughout the cleaning process!
As you clean, you’ll notice that you’ll have to apply a little more pressure to specific areas – this is normal!
Tip: As a guide, if you’re cleaning wooden window sills, you should spray the cleaning solution onto the cloth, as this gives you more control over how much liquid you’re using. Ideally, you shouldn’t get wooden sills too wet, so this method is ideal!
Step 6: Allow to air dry
When you’re done cleaning, you must leave your window sill to air dry. Open a window to speed up this drying process.
Ideally, your sill shouldn’t be too wet because you shouldn’t have soaked it in Step 5, so it should dry reasonably quickly!
However, if you’ve gone a bit wild with the cleaning solution, make sure you pop up any spillages or pools of water with a microfibre cloth. Don’t leave the water resting on the surface!
At this point, it would be worth cleaning the items you keep on the window sill. Having well-kept objects on the sill will enhance its appearance and will stop the sill from getting dirty straight after you’ve cleaned it!
Tip: If you’ve got painted wooden window sills at home, and they’re looking a little tired after being cleaned, it might be time to re-paint them! (Allow the sills to dry thoroughly).
Step 7: Repeat the steps above for your other window sills
Once you’ve cleaned one sill, you might as well clean the rest. Follow the steps above to clean your other window sills.
And don’t worry if you can’t fit all your sills into one day of cleaning, spread them out over multiple days.
How to Clean External Window Sills
You can clean external window sills by following the steps above (assuming that you can access the sills safely).
However, cleaning external window sills isn’t always easy because the dirt found on such surfaces is normally more challenging to remove.
Naturally, this means that you’ll have to use more elbow grease to get the job done, which can be tiring.
In addition, some steps mentioned above may not be possible to carry out. For example, using a hoover to suck up gunk isn’t suitable, so you’d have to swap a vacuum cleaner for a brush and sweep the dirt off the external sills instead.
And as mentioned earlier, you may not be able to reach your external sills safely, so you won’t be able to clean them. In this case, asking someone (like a professional window cleaner) for help is best.
How to Remove Mould from Window Sills
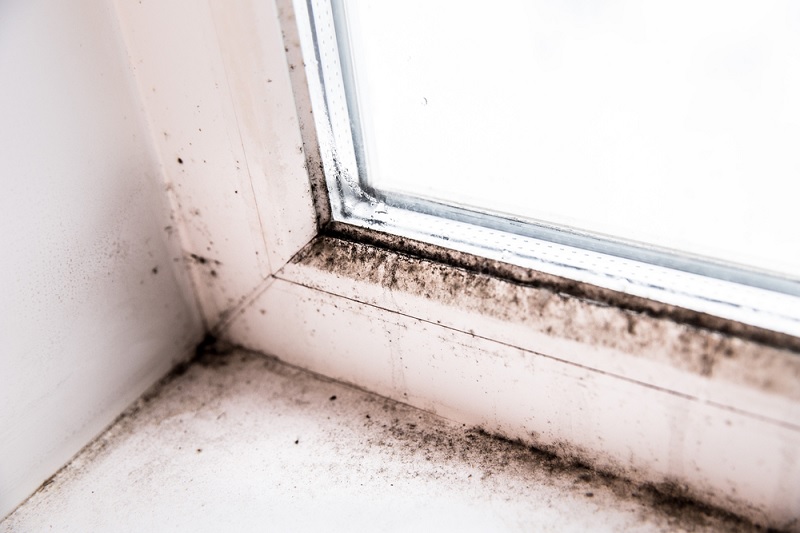
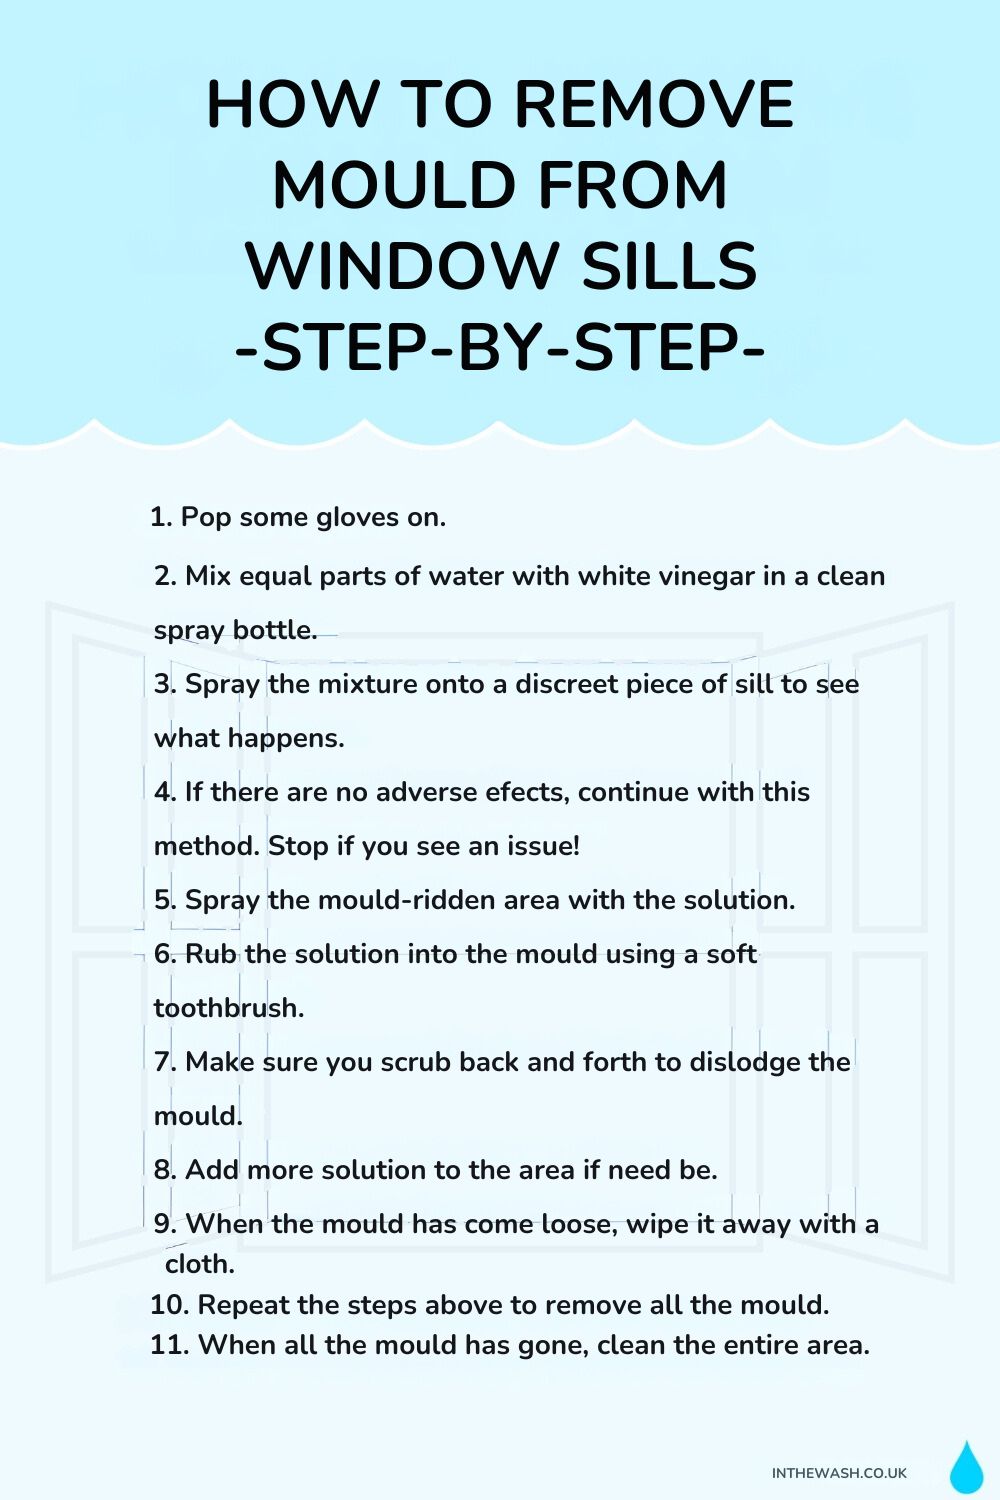
Mould is a pesky visitor that likes setting up home on windowsills. So how do you get the unwanted guest off your sills? Follow the steps below to eradicate the mould right now!
- Pop some gloves on.
- Mix equal parts of water with white vinegar in a clean spray bottle.
- Spray the mixture onto a discreet piece of sill to see what happens.
- If there are no adverse effects, continue with this method. Stop if you see an issue!
- Spray the mould-ridden area with the solution.
- Rub the solution into the mould using a soft toothbrush.
- Make sure you scrub back and forth to dislodge the mould.
- Add more solution to the area if need be.
- When the mould has come loose, wipe it away with a cloth.
- Repeat the steps above to remove all the mould.
- When all the mould has gone, clean the entire area.
As an alternative to the above, you could create a bicarbonate of soda and water paste and spread it over the mouldy patches.
Leave the paste alone for about 10 minutes, and then start rubbing the area gently with a soft toothbrush. When you’re done, wipe the surface with a slightly damp cloth.
In addition to this, you could also use hydrogen peroxide. But be aware that this will cause bleaching and may damage a wooden surface. (You do so at your own risk).
Of course, removing mould is only one part of the solution. The best solution is to actually prevent the mould from making an appearance in the first place. Stop mould by practising the following:
- Clean the window sill area frequently.
- Stop leaks.
- Ensure there’s good airflow (open the window and curtains).
- Remove condensation from window panes.
- Set up some moisture traps on the window sill to capture excess moisture.
- Don’t squash your curtains up against the window! Leave a gap between the curtain and the window so air can travel through and around.
- Use a dehumidifier to manage moisture levels in the air.
How to Clean Window Tracks
Tracks, like sills, get caked in dust, debris, and gunk from the outdoors and indoors, so they must be cleaned regularly. Otherwise, you’ll have murky, build-ups on the tracks that could hinder how effectively your windows open and close.
All you need to do is hoover all the tracks (vertical and horizontal) to remove clumpy grime, then dip a toothbrush in some warm soapy water and start rubbing all the tracks and crevices.
As you dislodge dirt from the tracks, you can wipe the area with a damp cloth to gather up the loose grime. Then you can carry on cleaning the tracks.
There’ll be a lot of tight spots to navigate on the tracks, so use smaller tools to clean out these areas! Butter knives, toothpicks and cotton buds will do the trick.
If you’ve got toughened debris caught in the tracks, follow the steps below:
Sprinkle bicarbonate of soda onto the tracks and then squirt some white vinegar on top. (These products will work together to break down the grime). Allow the solution to work for a few minutes, and then scrub the area with a toothbrush to dislodge the toughened debris.
When you’re done, you can run a damp cloth over all the tracks one final time to remove any dirty pieces you might’ve missed or any water droplets. You can then leave the windows open to dry.
It may take you some time to carry out this whole process, so take it easy!
And remember, to speed up this activity in the future, keep on top of this type of cleaning so you don’t have huge build-ups of gunk to manage! Try to clean the tracks three to four times a year.

Bethan has a passion for exploring, reading, cooking and gardening! When she’s not creating culinary delights for her family, she’s concocting potions to keep her house clean!


